


How to Draw Support and Resistance: The Complete Step-by-Step Guide
BY Maria K.
|July 3, 2026If you've ever stared at a price chart wondering exactly where to draw your support and resistance lines, you're not alone. This question is arguably one of the most misunderstood concepts in technical analysis. Learning how to draw support and resistance can help you develop a more structured approach to analysing price charts. It’s the basis for understanding price charts.
In this comprehensive guide, you'll understand the difference between lines, levels, and zones, learn how to identify support and resistance levels, and apply a practical 4-step process you can use on any chart, any market, and any timeframe. By the end, you should have the confidence to mark these critical price action zones with precision. More importantly, you'll understand how traders incorporate these levels into their trading plans.
What Is Support and Resistance? And Why It Matters
Before diving into the mechanics of drawing support and resistance lines, let's establish clear definitions.
Support is a price level where buying interest may increase, which can slow or temporarily halt downward price movement. Think of it as the "floor" beneath the market. When price approaches this level, buyers step in, demand increases, and the downward momentum slows or reverses.
Resistance is a price level where selling pressure may increase, which can slow or temporarily halt upward price movement. This acts as the "ceiling" above the market. When price approaches resistance, sellers emerge, supply overwhelms demand, and upward momentum stalls.
The psychology behind these levels is rooted in supply and demand. At support, traders remember that price previously bounced from that level, creating anticipation of another bounce. At resistance, traders recall that price failed to break higher, creating expectation of another rejection.
This concept of "market memory" is powerful. Price "remembers" these levels because many traders monitor these areas, which may contribute to repeated market reactions. The more times a level is tested, the more significant it becomes in the collective psychology of market participants.
An important clarification is that support and resistance is NOT a single exact price point. It's a region or zone where price has historically reacted. Thinking of S&R as a magical number is not accurate, but thinking of it as a zone of interest can lead to better trading.
Support and Resistance Lines vs. Levels vs. Zones: What's the Difference?
Understanding the distinction between these three terms will help improve your chart analysis.
Support or Resistance Lines are precise horizontal markers drawn at a specific price point on a chart in your trading platform. They are a good starting point for beginners, but they're too precise for how markets actually behave. As traders gain experience, they most often shift toward thinking in zones instead.
Support or Resistance Level is a general price area on a chart where price has bounced or reversed multiple times. The term is often used interchangeably with line, but it implies slightly more flexibility in how price may react.
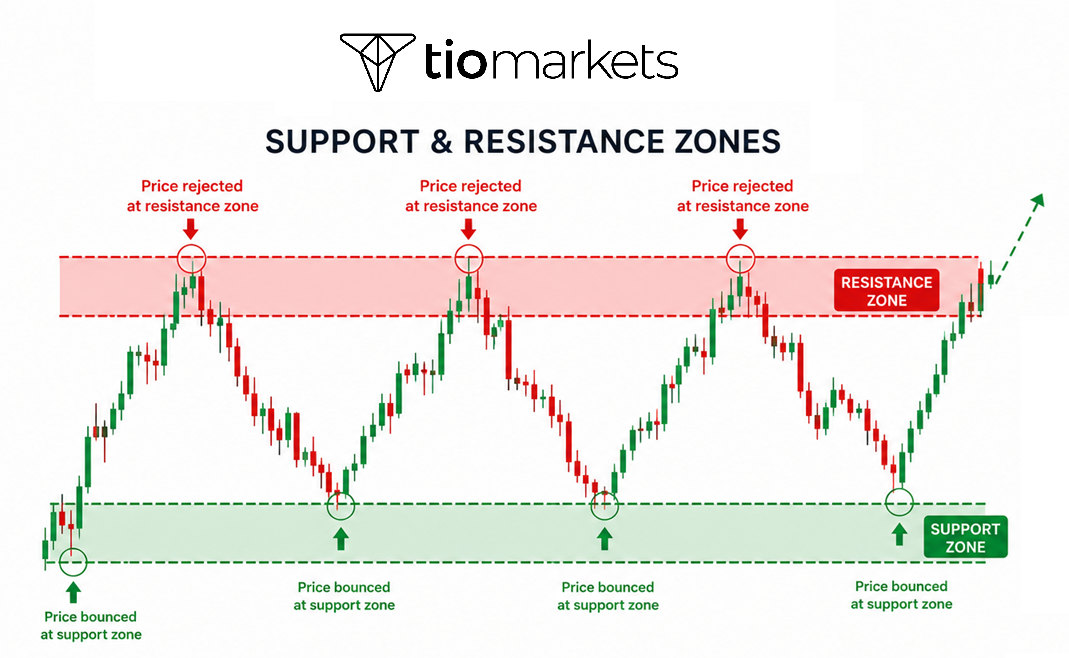
Support or Resistance Zone is a wider band or range of prices where price has historically reacted. Zones are more practical than exact lines because markets are messy and don't operate with surgical precision. Different traders enter and exit at slightly different prices, creating a range of activity rather than a single point. The image below shows a wider zone of S&R.
Step-by-Step: How to Draw Support and Resistance Lines on Any Chart
Now let's get practical. Here's the 4-step process for drawing support and resistance lines that works across any market, stocks, forex, crypto, or commodities.
Step 1: Start with a Clean Chart, Remove All Indicators
The first rule of identifying support and resistance is to strip your chart down to price only. Remove moving averages, RSI, MACD, and any other indicators cluttering your view.
This is because support and resistance levels must be identified on raw price action. Indicators can be added later to confirm signals, but they shouldn't influence where you draw your S&R levels.
Use candlestick charts (preferred over line or bar charts) and set a neutral background color for maximum clarity. You want to see the price and nothing else.
Step 2: Select the Right Timeframe and Load Enough Historical Data
The timeframe and amount of historical data to load depends on individual trading styles.
- Swing trading or positional trading: Suggestion is to use the Daily chart and load 12–18 months of data
- Intraday or day trading: Suggestion is to use the 15-minute chart and load 3–6 months of end-of-day data (or the last 10–15 trading sessions)
- Long-term investing: Suggestion is to use the Weekly chart with 2–3 years of data
As a rule of thumb, using more historical data may provide additional context when identifying frequently tested price areas. A support level that has been tested over 18 months is far more significant than one that appeared last week.
Step 3: Identify Price Action Zones - The Key to Accurate S&R
Look for price action zones at or near the same price level. A price action zone is any area where price demonstrated significant behavior, i.e. the price hesitated to move higher after a brief rally, hesitated to move lower after a brief decline or it made a sudden, decisive turn at a specific area.
These price action zones should be well-spaced in time not clustered together. Many traders consider price reactions spread over longer periods to carry greater analytical significance, although interpretations vary.
Step 4: Connect the Price Action Zones
It’s time to connect the dots. Drawing a horizontal line that passes through at least 3 price action zones is a way to do it. The line doesn't need to be perfect. It can bisect candle wicks or even cut through candle bodies. Markets are imprecise, and your levels can reflect that reality.
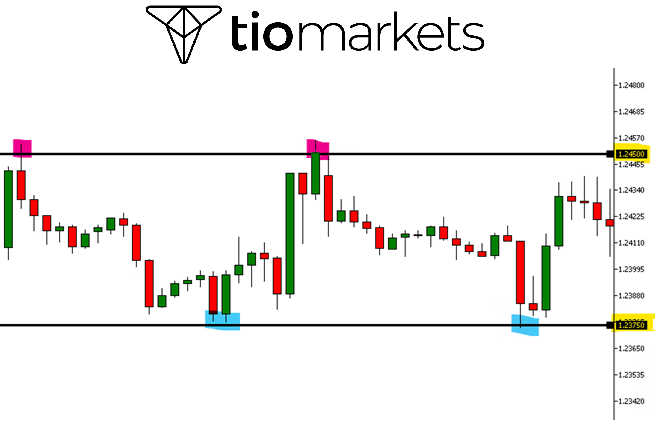
Once your line is drawn, you can determine whether it's support or resistance based on the current market price. If the level is below the current price is Support, if it’s above the current price is Resistance.
Many traders look for multiple historical reactions before considering a level noteworthy.
How to Draw Support and Resistance Zones (Not Just Lines)
While lines are useful, drawing support and resistance zones provides a more realistic framework for trading decisions.
In order to construct zones properly the principles are: For a Support Zone the lower boundary is the lowest wick or low of the price action zone. The upper boundary is the nearest candle close above that low. For a Resistance Zone the upper boundary is the highest wick or high of the price action zone. The lower boundary is the nearest candle close below that high.
On your charting platform, you can use rectangles instead of single lines to mark these zones.
Static vs. Dynamic Support and Resistance: Which Should You Use?
Static Support and Resistance refers to the horizontal lines and zones we've discussed. These are fixed price levels that don't change regardless of market movement. They are the foundation of technical analysis support & resistance concepts.
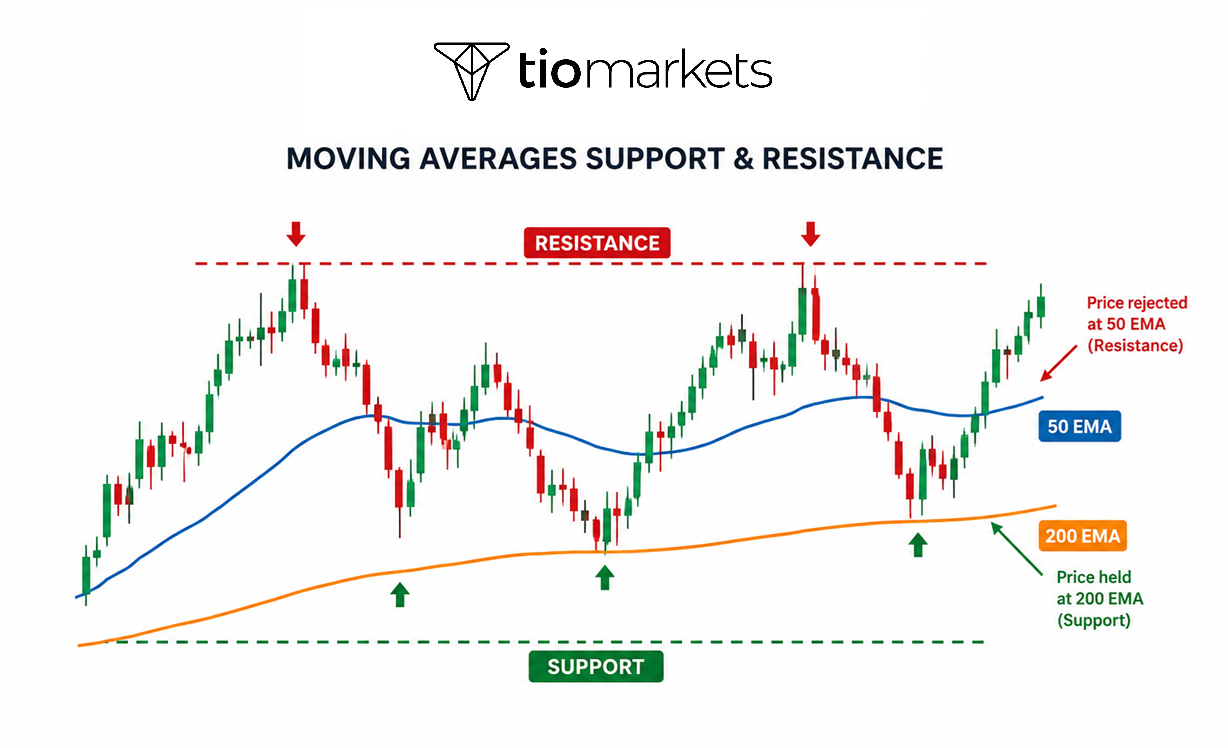
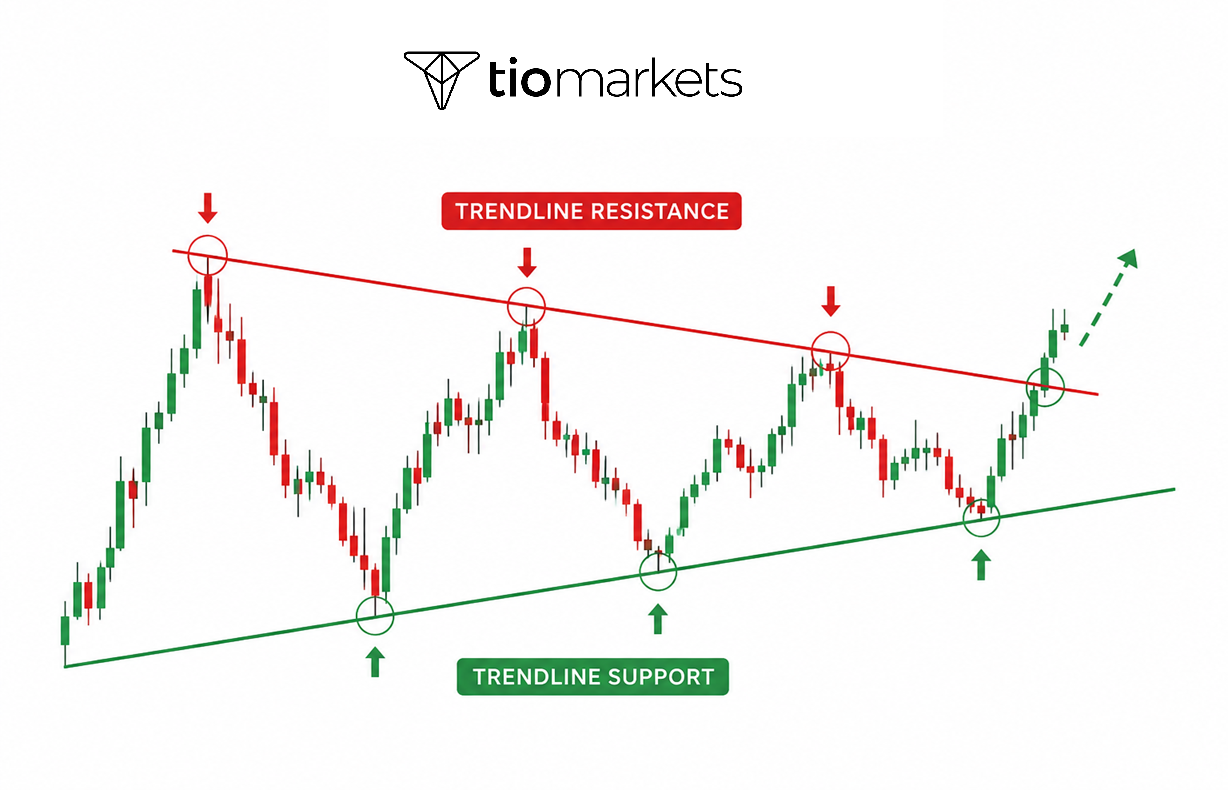
Dynamic Support and Resistance is identified by various indicators that move along with the price - not one horizontal line or zone.
- Moving averages act as dynamic S&R as price oscillates around them.
- Trendlines connect higher lows (in an uptrend) or lower highs (in a downtrend).
- Bollinger Bands expand and contract with volatility.
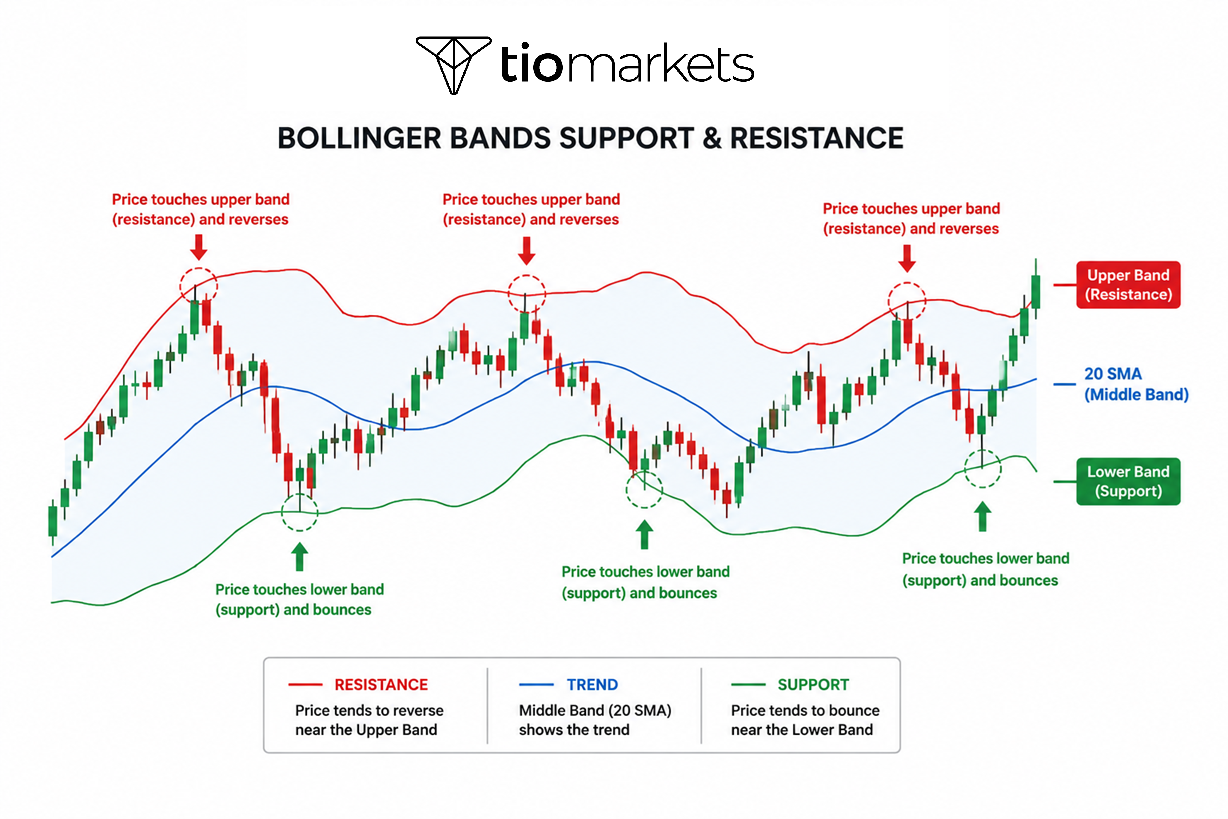
Static support and resistance is commonly used in ranging markets, while dynamic approaches are often applied in trending conditions.
For example, when a stock is trading at all-time highs or all-time lows, you cannot rely on and draw static support or resistance because there's no historical data to reference. Traders choose to use trendlines or dynamic indicators in these situations. Understanding the difference between static and dynamic S&R will help you adapt to different market conditions.
How to Use Support and Resistance in Your Trading
Drawing support and resistance is only the start. The real value comes from integrating these levels into a complete support resistance trading strategy. How do traders use support and resistance? It’s useful because it may help traders identify potential entry areas, stop-loss placement, and possible profit targets as part of a broader trading plan.
The Psychology Behind Support and Resistance: Why It Works
Support and resistance is often interpreted through market psychology, where previous price reactions may influence future trader behaviour.
Markets are driven by people, and people tend to remember price levels where something important happened. Traders remember where they bought, sold, or missed an opportunity. When price returns to those levels, emotions like fear, hope, and regret influence decisions, which is why the same price areas often see similar reactions. This may contribute to recurring price reactions, although outcomes differ across market conditions.
It is important to remember that sometimes the price will drop below the identified support levels or reverse before it gets to the previous support level. The same applies for resistance. The price might reverse before it gets to the previous resistance level or break through it.
Mastering How to Draw Support and Resistance Takes Practice
Identifying support and resistance is not exact like science. It improves with practice, repetition, and exposure to real market conditions. Sometimes even experienced traders don't always agree on exact levels. What matters is having a logical, repeatable process.
Support and resistance is the foundation of nearly every technical analysis strategy. Developing this skill can provide traders with a structured framework for analysing price action.
If you are ready to test your knowledge, you can simply register with TIOmarkets.

FAQ
Risk disclaimer: CFDs are complex instruments and come with a high risk of losing money rapidly due to leverage. You should consider whether you understand how CFDs work and whether you can afford to take the high risk of losing your money. Never deposit more than you are prepared to lose. Professional client’s losses can exceed their deposit. Please see our risk warning policy and seek independent professional advice if you do not fully understand. This information is not directed or intended for distribution to or use by residents of certain countries/jurisdictions including, but not limited to, USA & Countries included in the OFAC sanction list. The Company holds the right to alter the aforementioned list of countries at its own discretion.
TIOmarkets offers an exclusively execution-only service. The views expressed are for information purposes only. None of the content provided constitutes any form of investment advice. The comments are made available purely for educational and marketing purposes and do NOT constitute advice or investment recommendation (and should not be considered as such) and do not in any way constitute an invitation to acquire any financial instrument or product. TIOmarkets and its affiliates and consultants are not liable for any damages that may be caused by individual comments or statements by TIOmarkets analysis and assumes no liability with respect to the completeness and correctness of the content presented. The investor is solely responsible for the risk of his/her investment decisions. The analyses and comments presented do not include any consideration of your personal investment objectives, financial circumstances, or needs. The content has not been prepared in accordance with any legal requirements for financial analysis and must, therefore, be viewed by the reader as marketing information. TIOmarkets prohibits duplication or publication without explicit approval.
Join us on social media



Authors BIO

Maria is a writer and content strategist with over 10 years of experience in the finance industry. She specializes in developing research-backed articles that help financial professionals navigate complex market topics with confidence. Her expertise spans forex, stocks, CFDs and global markets, creating insightful content that educates readers and supports informed decision-making.